Materials
- Large baking pan or shallow cardboard box
- Flour (enough to fill the pan)
- Cocoa powder (enough to create a thin layer on top of the flour)
- Sieve or sifter
- Balls of various sizes
- Optional: ruler and meter stick
Prep Work
This project is messy—if possible, you should do it outside. If you must do the project inside, lay down a sheet or towels first to make clean-up easier.
Instructions
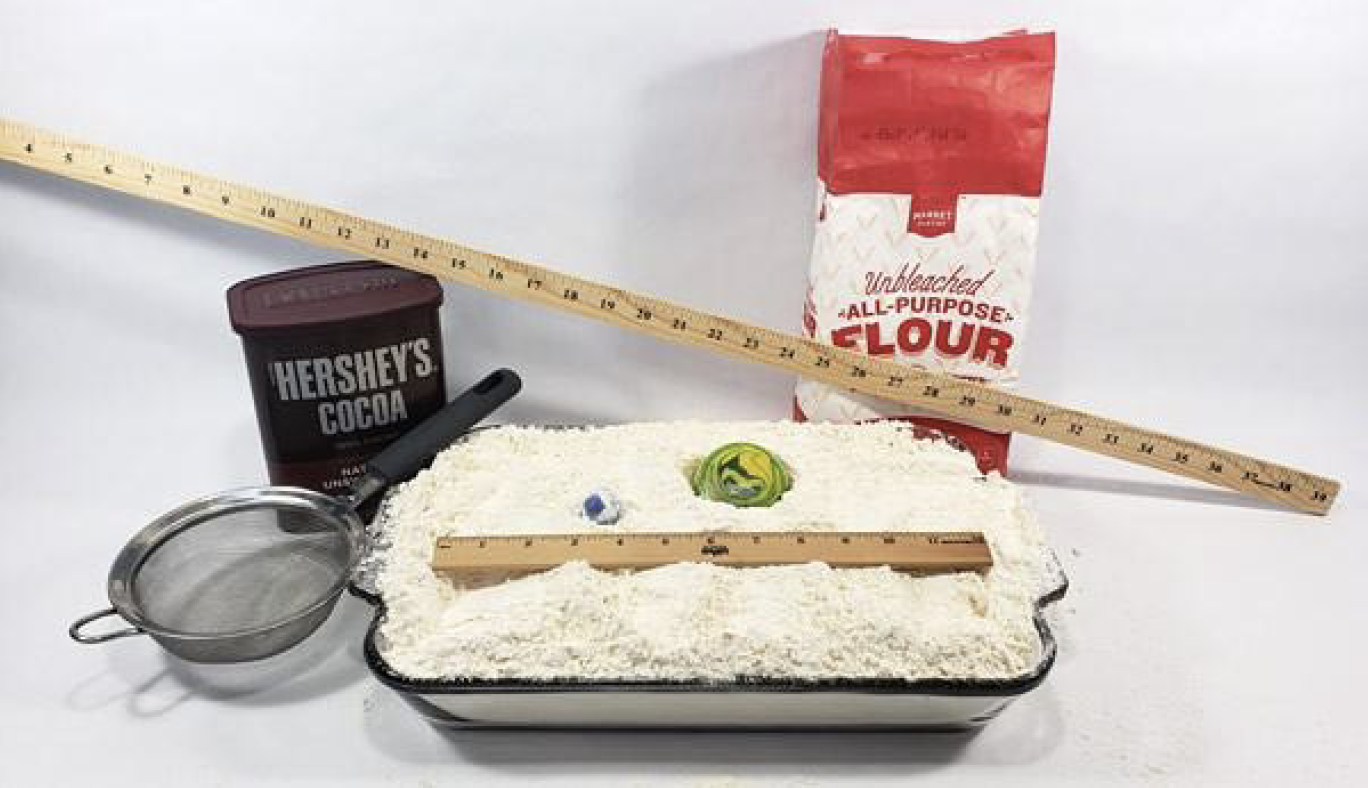
1. Fill the baking pan with flour.
2. Use the sieve to put a thin layer of cocoa powder on top of the flour.
3. Try dropping a ball into the pan from about half a meter above it (optionally, use the meter stick so you can drop from a consistent height).
4. Look at the resulting impact crater. What color is the surface immediately around the crater? How does that compare to the surface of the rest of the pan? How far did the flour and cocoa powder spread? Optionally, use the ruler to measure these distances.

5. Try dropping the same ball from a different height. What does the resulting crater look like?
6. Try dropping balls of different sizes from the same height, and examine the resulting craters.
7. You can even try throwing a ball sideways so it hits the pan at an angle, instead of coming straight down. How is the resulting impact pattern different from when you dropped the balls straight down?
8. If needed, smooth out the surface of the pan, and sift a fresh layer of cocoa powder on top.
Clean Up
If you did the project inside, vacuum or sweep up any flour and cocoa powder that got on the floor.
What Happened?
You should have found that the bigger the ball, or the faster it was moving, the bigger the resulting crater would be. This is because larger, faster-moving balls have more kinetic energy than smaller, slower-moving balls. This energy is transferred to the flour and cocoa powder when the ball hits the ground, causing it to fly outward, creating the crater (and a mess!). You should also have seen that the impacts churned up the “soil,” bringing some of the white flour to the surface near the impact site. While the pattern around the crater was probably symmetric if you dropped the ball straight down, sideways impacts would result in asymmetric patterns as more flour/cocoa powder were thrown in one direction than the other.
Digging Deeper
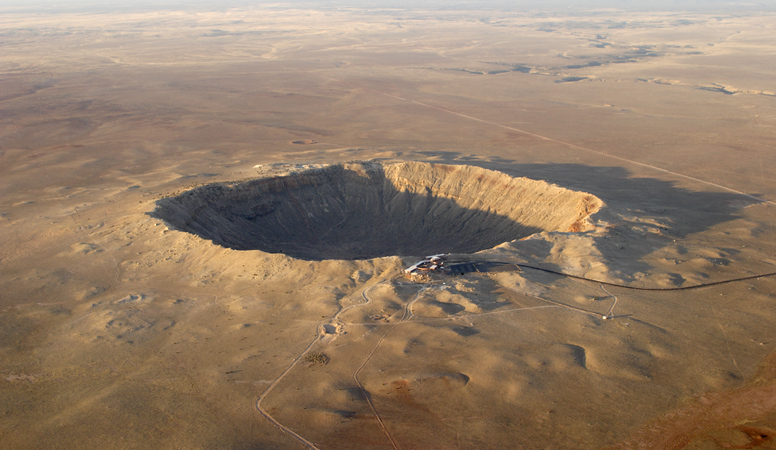
Craters are round, bowl-shaped depressions surrounded by a ring, like the one shown below.
Impact craters are made when a meteorite crashes into a planet or moon (as opposed to volcanic craters, which are created when a volcano erupts). Just like in your science experiment, the size and shape of the crater depends on how big the meteorite was and how fast it was going when it hit the ground. A bigger, faster-moving meteorite will create a bigger crater, sometimes throwing material very far away from the impact site.
Some of the craters on the Moon are so big that you can see them with the naked eye! While Earth has over 100 known impact craters, not all of them are obvious. Unlike the Moon, Earth has an atmosphere with weather that causes erosion (wind and rain), along with animals and plants that can move soil and change landscapes over time. So, some craters on Earth’s surface may be eroded or overgrown. Many meteoroids (they are called meteoroids while they are still in space, and meteorites once they hit the ground) also burn up in Earth’s atmosphere, never reaching the ground at all.
For Further Exploration
- Scale this project up! Do you have access to a sandbox, a shovel, and some dirt? Try the project outside. Create a large pile of loose material: dirt covered with a layer of sand (similar to the flour covered with cocoa powder). Ask an adult for help dropping a larger ball, like a basketball, from a higher location (like standing on a ladder).
- For a more colorful project, use colored sand or sprinkles instead of cocoa powder. Create a rainbow of different layers, or different patterns on the surface, as shown in this video. What do your resulting craters look like?
- Do you have a smartphone with a slow-motion camera setting? Try filming your meteorite impacts in slow motion! What do you see when you watch the videos?

Materials
- Computer with access to a printer to print the paper helicopter template. (If you do not have access to a printer, you can use a ruler and pencil to draw your own paper helicopter template based on the online one.)
- Printer paper
- Scissors
- At least 2 identical paper clips
- A safe, high place from which to drop the paper helicopter. (You could have an adult help you stand on a chair or choose a balcony with safe railing, for example.)

Prep Work
- Download and print the paper helicopter template. If you do not have access to a printer, you can download the file and open it on your computer. Then use a pencil and ruler to draw the paper helicopter shapes on a piece of paper, based on the dimensions in the template.
- Follow the directions on the template to cut out and fold both paper helicopters.

3. On each paper helicopter, slide one paperclip over the folded tab at the bottom.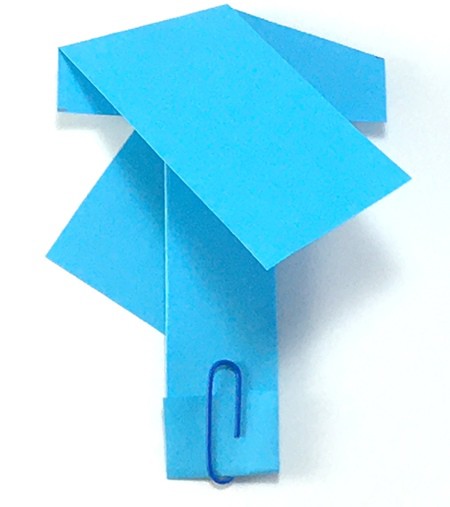
Instructions
1. Hold the paper helicopter by the middle with the paper clip facing down, then let it go from high up. If it does not spin down, have an adult help you drop one of your paper helicopters from a safe, elevated location (such as while standing on a chair or a step stool, from a balcony, etc.)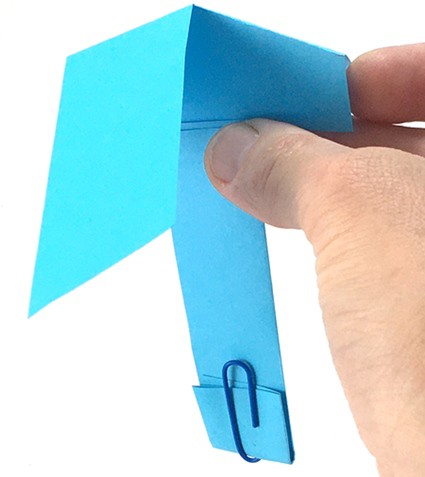
2. Compare the two paper helicopters.
3. Try it out!
4. Drop each paper helicopter a couple more times from the same height.
5. As your helicopter starts to rotate, the spinning blades generate lift that slows it down. When you look carefully, you may notice this. Drop a paper helicopter and pay attention during the first fraction of a second before it starts to spin. Compare how fast the helicopter falls during that fraction of a second to how fast it falls once it starts spinning.
6. Because Mars’s atmosphere is about 100 times thinner than Earth’s atmosphere, it is much harder for a helicopter to create enough lift to get off the ground. Engineers had to change the blade design to create more lift so the helicopter could fly in Mars’s thin atmosphere. You have two paper helicopters where only the blade length is different.
7. Blade length is just one way to change the helicopter design.
8. Look at all your test results.
9. Compare your findings with the illustration of the helicopter Ingenuity on the surface of Mars (illustration from NASA). This helicopter will fly around and help NASA’s Perseverance rover explore Mars.
What Happened?
When you drop a paper helicopter, it will take a fraction of a second for it to start spinning and slow down. Did you notice how it fell faster before it started spinning? Once the paper helicopter spins, it should generate a push called “lift” which slows its descent to the ground. The paper helicopter that has shorter blades should fall faster because the shorter blades do not generate as much lift.
There might not be one single design for a paper helicopter that allows it to descend the slowest. That said, longer and wider blades that hit the air at an angle are generally better. These changes to the blades generally create more lift, and as a result, slow down the fall of the paper helicopter more. If you change the dimensions of your paper helicopter too drastically, however, your helicopter may actually become unstable and perform worse.
Due to its thin atmosphere, the blades of a Mars helicopter’s must be bigger and spin faster than they would on Earth in order to generate enough lift. NASA’s Ingenuity helicopter is very lightweight—only 4 pounds (on Earth)! Each blade is about 2 feet (0.6 meters) long, and the blades rotate about 2400 times per minute. A solar panel powers the helicopter and it operates autonomously. It is designed to land safely on the uneven Martian terrain. This way, it can help NASA’s Perseverance rover explore the Martian surface.
Digging Deeper
Mars’s gravity is much weaker than Earth’s (about 38%). This means that while the Ingenuity helicopter weighs 4 pounds on Earth, it only weighs about 1.5 pounds on Mars! You might think that this makes it much easier for the helicopter to fly. However, Mars’s thin atmosphere actually makes it more difficult. A helicopter needs air to fly. Air is made up of tiny particles that bounce around and press against everything around them. When the particles flow over a spinning helicopter blade, they collectively press up on the bottom of the blade harder than they press down on the top. This generates a net upward push, called lift. In general, the more particles there are packed closely together, the harder they can press on surfaces. In the thin Martian atmosphere, the particles are spaced much farther apart. In order to take off, the lift generated by the helicopter must be bigger than its weight, the force of gravity pulling it down. The reduction of lift due to the thinner atmosphere is much larger than the reduction of weight, therefore, in the thinner Martian atmosphere, the blades must be bigger and spin faster than they would in Earth’s thicker atmosphere.
Other factors, like changing the shape or angle of the blades, can also influence lift. You may have experimented with some of these factors with your paper helicopter designs. Your paper helicopters did not generate enough lift to fly upward, but the lift helped slow their descent. The more lift they generated, the slower they fell.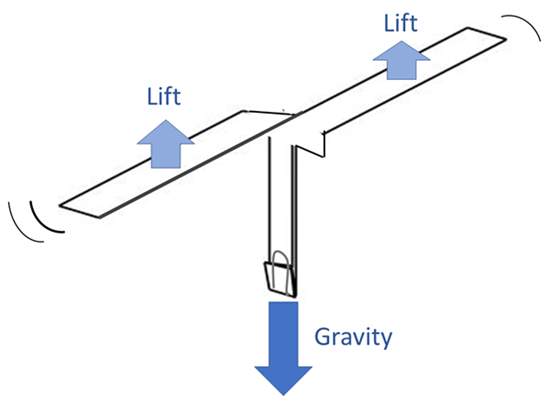
Further Exploration
- Make paper helicopters out of other types of paper. Does the type of paper make a difference?
- Look up how to make a hand propeller toy and explore the effect of changes on the rotor blade design.
- Can you make the blades of your paper helicopter turn in the other direction?
- Use a stopwatch to time how long it takes for each paper helicopter to fall from a fixed height. The longer it takes, the slower the helicopter falls. Instead of a stopwatch, you can also film a slow-motion video and count the number of frames it takes for the helicopter to fall over a specified distance. The more frames it takes, the slower the helicopter falls. To calculate the time, divide the number of frames by the frame rate at which the slow-motion video was recorded. Many smartphones record slow-motion video at 120 or 240 frames per second, but you will need to look up this number for your phone. For example, if you counted 30 frames and recorded a rate of 120 frames per second, the fall took 30/120 or 0.25 seconds.


Materials
- Paper Rocket
- Student Instructions (0ptional)
- 2 sheets of 8.5×11 – inch paper (white or color) OR custom skins
- Cellophane tape OR masking tape
- Scissors
- Markers for decorating/naming rockets
- 24 inch length of 1/2-inch PVC pipe (for the rocket form)
- Stomp rocket launcher
- Stopm Rocket ASssembly Instructions Download PDF
- 5 foot lenght of 1/2-inch PVC pipe cut into various lenghts (see assembly instructions)
- 2 PVC 45-degree elbows slip connectors
- 2 PVC tee slip connectors
- 2 PVC slip caps
- Duct Tape
- Empty 2-liter bottle(plus spares if available)
- String OR Thread
- Penny or similar weight
- Paper clip
Management
Preparation:
Prepare for the lesson by watching the “Do It Yourself Space: Stomp Rockets” videos available above.
Prior to launch day, construct at least one rocket launcher. Take the Stomp Rocket Launcher Assembly Instructions to a hardware store to make purchasing the right pieces easy. While at the hardware store, purchase enough 1/2-inch PVC pipe to make the launchers and the rocket forms. If you do not own a PVC cutter, it’s a good idea to purchase one or ask the hardware store to pre-cut the PVC pipe for you in the specified lengths. You may also use a fine-tooth saw to cut PVC.
Safety Note: Use caution when cutting the PVC for the launcher and rocket forms.
Building The Rockets
1. Roll a piece of 8.5 x 11-inch paper snuggly (but not too tightly) around a 24-inch length of 1/2-inch PVC pipe. Optionally, use one of the custom skins.
2. Tape the paper to itself (but not to the PVC pipe). Use enough tape to completely seal the seam, making the seam airtight. This will be the body, or fuselage, of your rocket.
3. Slide the fuselage off the PVC form. Verify that the fuselage slips easily from the PVC form so that it will fit on the launch tube later.
4. Make a nose cone either by pinching one end of the fuselage, folding it over and taping it to the rocket body; or by cutting out a 3/4 circle, rolling it into a cone shape and taping it to the fuselage. Optionally, use the custom nose-cone template. Secure the nose cone using plenty of tape to make the rocket airtight. (Blow through the rocket from the bottom to check for leaks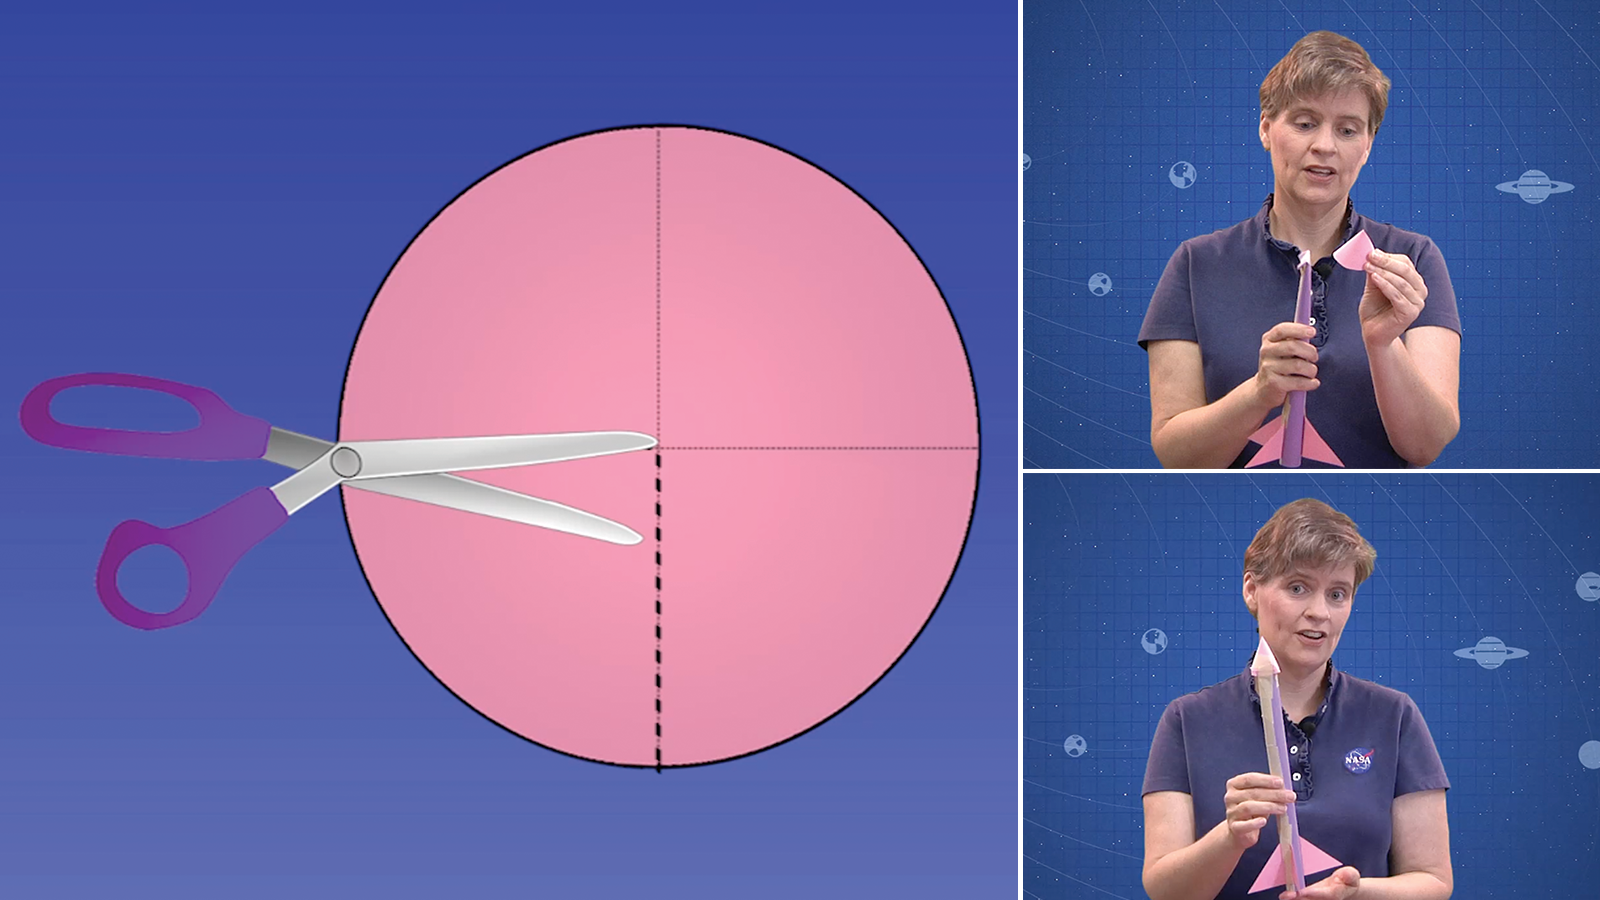
5. Cut out fins (of any shape) and attach them symmetrically to the lower part of the fuselage (opposite the nose cone), leaving the opening at the bottom of the fuselage open and clear of tape.
Allow students to experiment with the size and shape of their rocket fins. Through repeated flights, students will discover that proportional, firm fins will provide the most stabilization to their rocket and eliminate drag.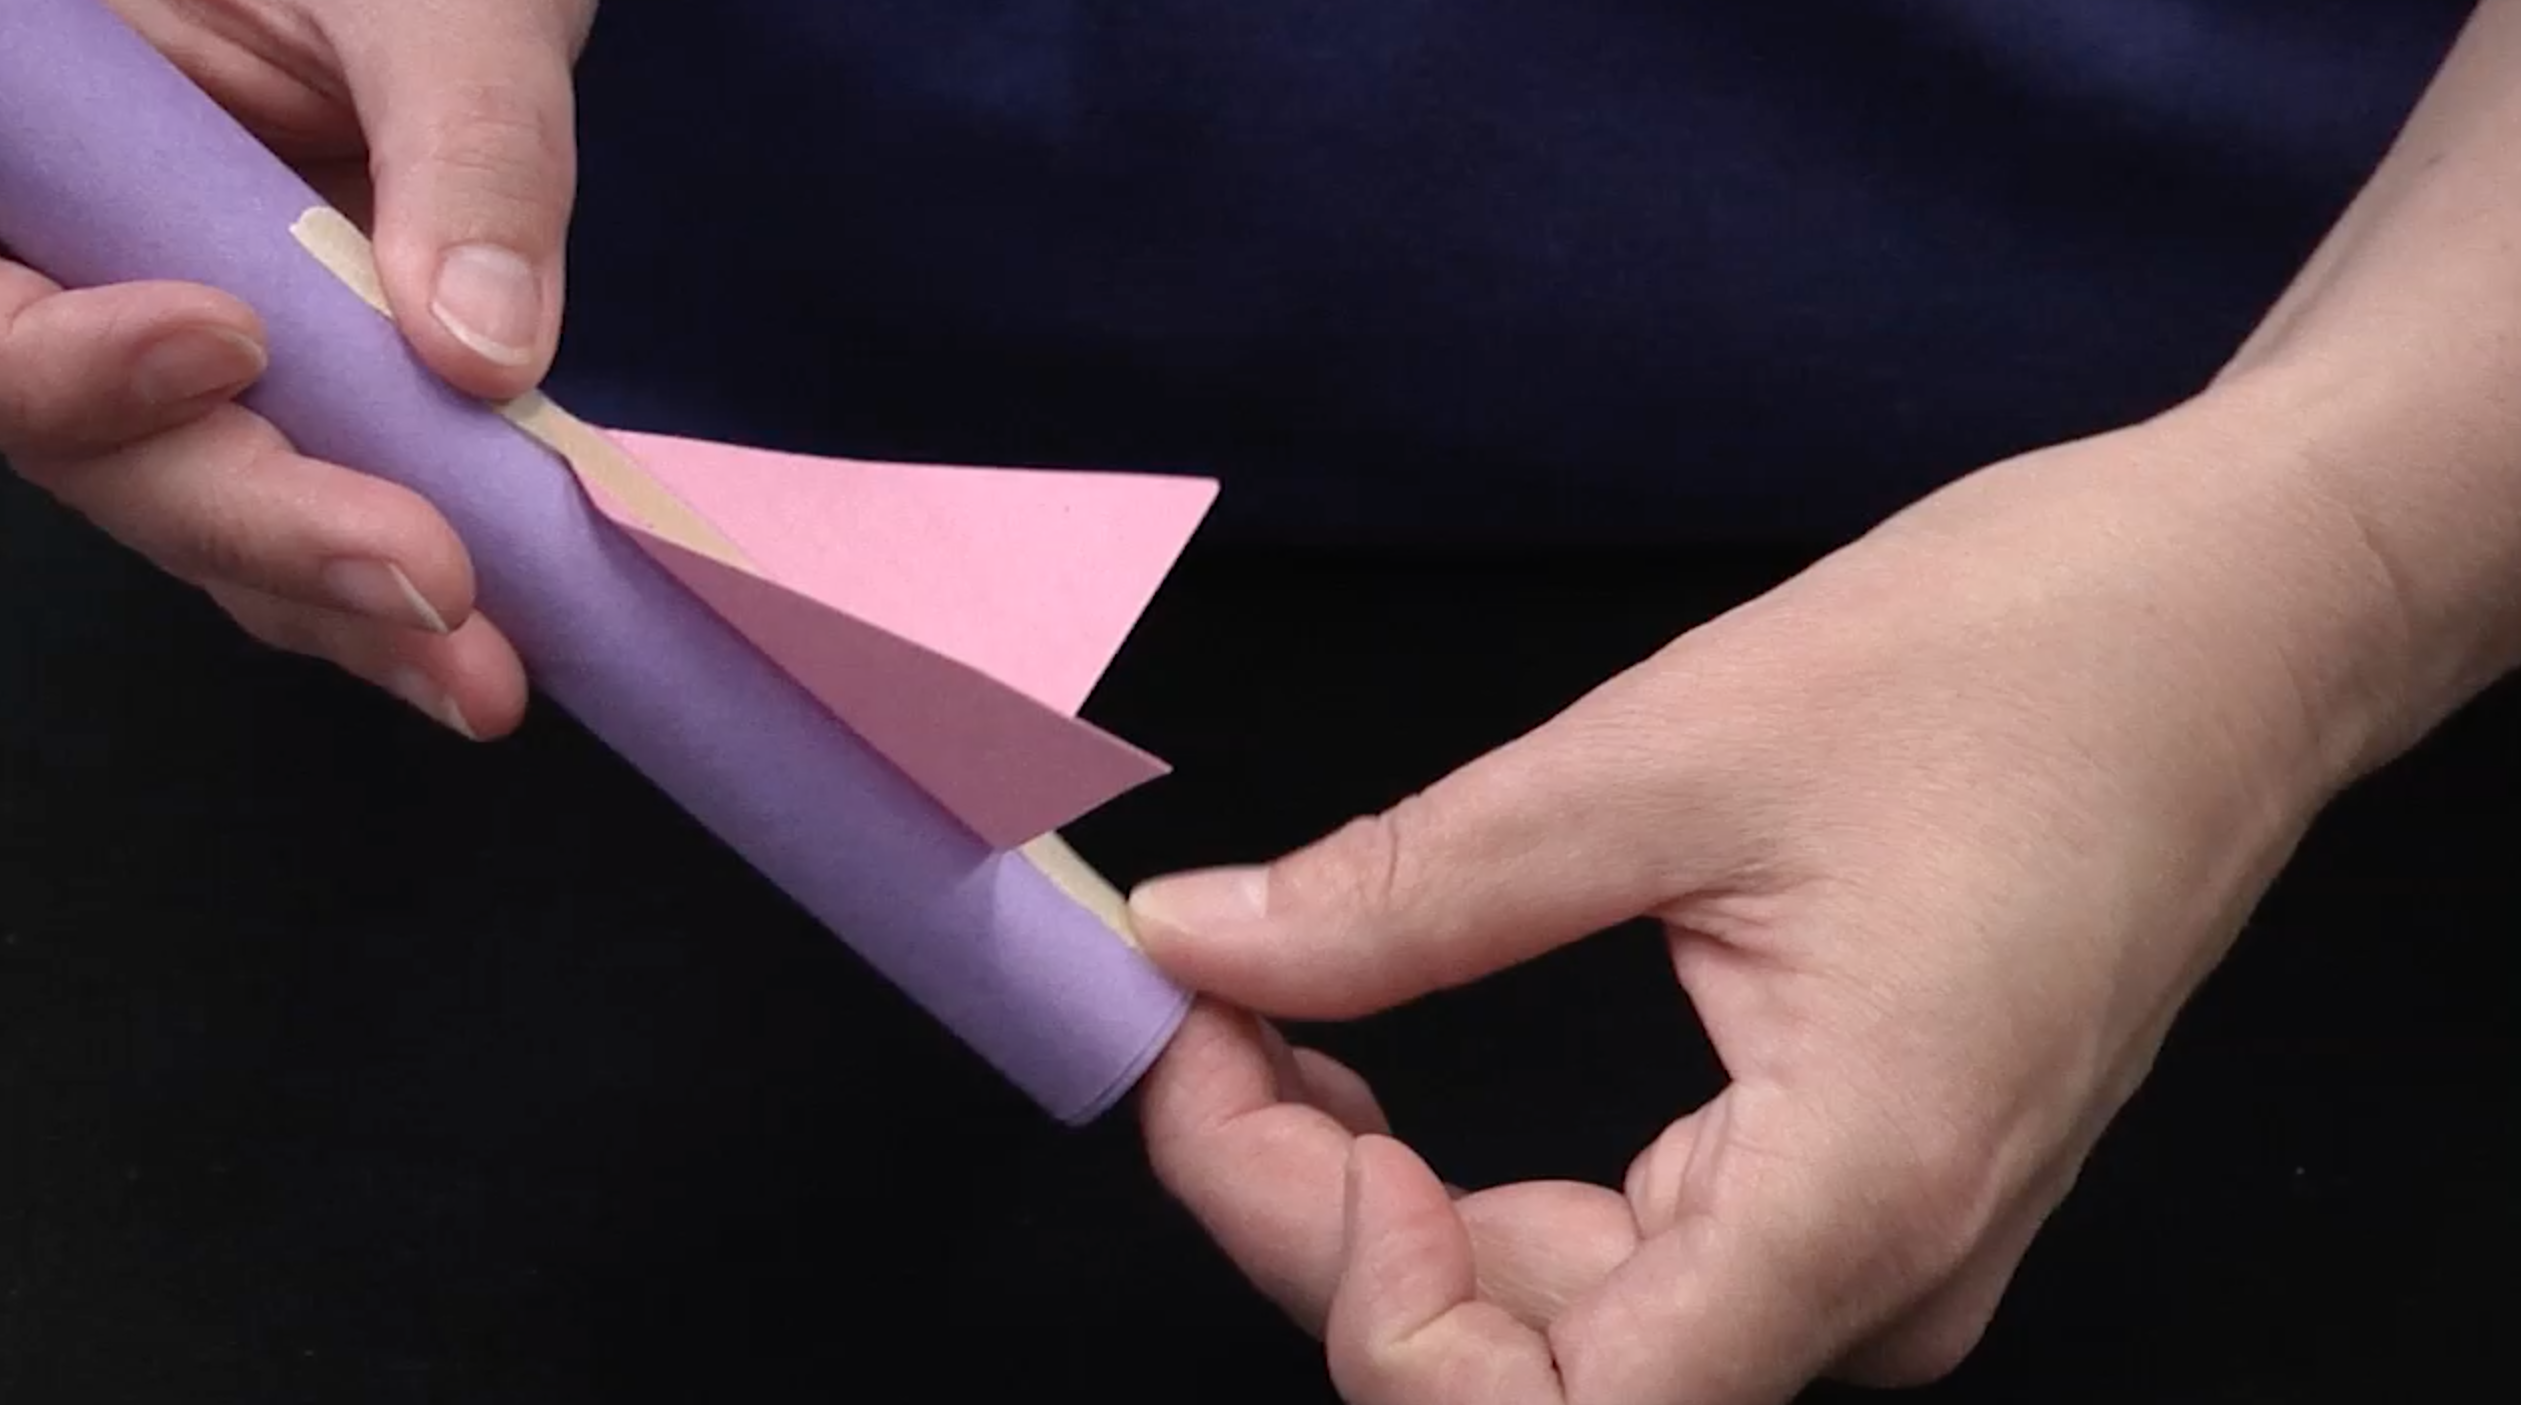
6. Have students color and name their rockets to differentiate them from other rockets in the group.
Launching the Rocket
When headed out to launch, always have spare empty 2-liter soda bottles and duct tape handy. Though some bottles will launch 20 to 40 rockets, bottles will eventually fail and will need to be replaced.
Because of their lightweight design, stomp rockets perform best on non-windy days. If you are located in a windy location, try to orient your launch location behind a windbreak such as a gymnasium or other large building.
Secure an outdoor location that is clear of overhead obstructions (trees, building roofs, power lines, etc.) and has a ground area of at least 100 meters by 25 meters for best altitude-tracking results. A shorter, 50-meter or 25-meter baseline may also be used.
If calculating altitude using tracking stations A and B, place the rocket launcher at the midpoint of a 100-meter baseline. If estimating altitude using local markers such as marks on buildings, orient the rocket launchers and observers appropriately.
Stomping: Be sure students stomp on the bottle across the bottle label, perpendicular to the body of the bottle. This is the most flexible zone of the bottle and allows for it to be reused numerous times. If students stomp on the bottom end of the bottle, it will often shatter, rendering the bottle unusable.
Aiming: The PVC legs of the launcher are different lengths. This allows for adjustment on uneven ground and aiming the launch into the wind if you are launching on a windy day. (Launching into the wind will compensate for rocket drift and make rockets easier to track and retrieve.) Additionally, horizontal distance competitions can be held and launch angles adjusted. Place a basketball in the landing zone, have students imagine the ball is Mars, and launch their rocket to Mars! If performing horizontal launches, a large indoor space such as a cafeteria or gymnasium may be used.
Re-inflating the bottle: Bottles can be easily re-inflated using air from your lungs. Place your hand in a fist around the open end of the launch tube and blow into your fist to re-inflate the bottle. Using your fist protects you from the unsanitary conditions that may exist on your rocket launcher.


Materials
- Pan or tray
- Lemons
- Cutting knife
- Butter knife
- Spoon
- Measuring cup
- Baking soda
- Food coloring

Prep Work
- Have an adult cut the top and bottom off the lemon so it stands upright.

Instructions
- Use a butter knife and spoon to break up/partially scoop out the inside of the lemon.

- Add a few drops of food coloring to the inside of the lemon.

- Pour some baking soda on top of the lemon

- Use the butter knife to mix the baking soda with the inside of the lemon.
Watch it go! What happens?
- Keep mixing with the knife periodically, and adding more baking soda, until the reaction stops.
Clean Up
The foam is safe to rinse down the drain. You can throw the lemons in the trash or compost.
What Happened?
When you added the baking soda, it started to fizzle and foam a little bit. When you mixed the baking soda into the lemon with a knife, it should have started foaming a lot more, bubbling up and over the sides of the lemon. Eventually the reaction slowed down and stopped. See the Digging Deeper section to learn about the chemical reaction that creates the foam!
Digging Deeper
Lemons are a type of citrus fruit, along with limes, oranges, and grapefruit. Citrus fruits are known for their sour taste, which you probably noticed if you’ve ever eaten one! Citrus fruits taste so sour because their flesh contains a lot of citric acid. Citric acid, like any other acid, is a chemical that has lots of hydrogen ions (H+). These hydrogen ions are what our taste buds recognize as a sour taste. Acids like to get rid of their hydrogen ions, and do this by reacting with other chemicals, called bases, that contain lots of hydroxide ions (OH–). When an acid and base combine (this is called an acid-base reaction), they neutralize each other.
Baking soda (NaHCO3) is a base, which means it contains hydroxide ions. When it comes in contact with an acid, such as citric acid, a chemical reaction starts. The reaction neutralizes the acid and releases carbon dioxide (CO2) gas. This gas wants to escape the liquid, creating bubbles. This is exactly what you see in the lemon volcano reaction. The citric acid, which is released into the lemon juice when mashing the fruit, reacts with the baking soda that you pour over the lemon. As soon as they both combine, carbon dioxide gas is produced and creates bubbly foam. Once the citric acid and the baking soda have neutralized each other, the reaction stops, so eventually your volcano will stop erupting.

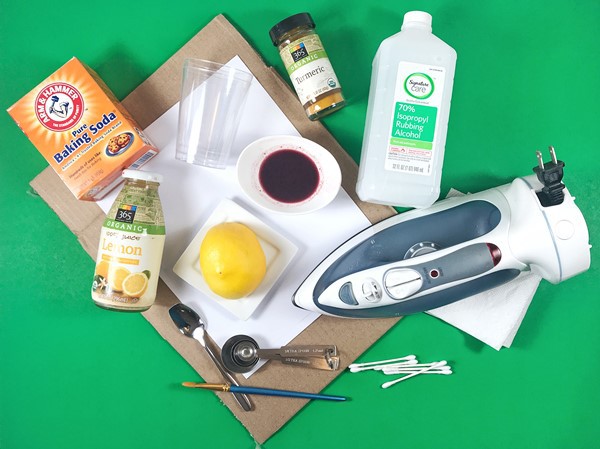
Materials
Tools:
- Cardstock
- Measuring spoons
- 3 cups or small bowls
- Spoon
- Q-tips or a brush
- Old newspaper or cardboard
- Paper Towels
Method 1:
- Water
- Lemon or lemon juice
- Iron
Method 2:
- Baking soda
- Water
- Turmeric and rubbing alcohol OR concentrated grape or blueberry juice. Note: Instead of rubbing alcohol another high percentage alcohol (40 percent or more) can be used. Water does work as well but the results won’t be as intense.
Prep Work
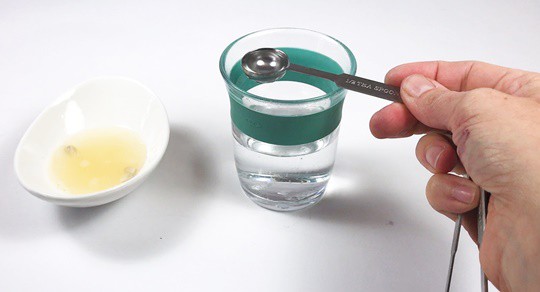
- Squeeze the juice of half a lemon into a cup or small bowl.
- Add half a teaspoon of water to the lemon juice and mix it with a spoon.
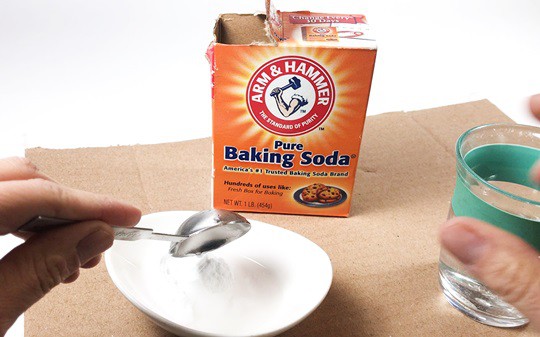
- Mix 1 tablespoon of baking soda with one tablespoon of water in a second cup or bowl.
- Mix 1/2 teaspoon of turmeric powder with 3 tablespoons rubbing alcohol in a third cup or bowl. Note: Instead of rubbing alcohol, you can also use another high percentage alcohol (40 percent or more). Water is an option as well but the results won’t be as intense. Note that the turmeric will only fully dissolve in the rubbing alcohol. In other solutions you will still see some undissolved turmeric. However, this does not affect your results.

Instructions
Method 1:
- Dip a Q-tip into the lemon juice-water solution.
- Use the damp Q-tip to draw a letter, symbol, or write a secret message on the white cardstock paper. Re-wet your Q-tip if necessary. Be careful to not soak the paper too much.
How does the paper look after you have written on it? Can you see your message?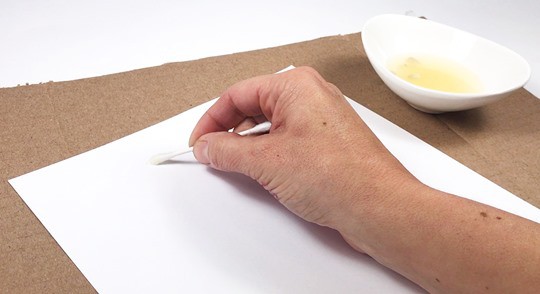
- Let the paper dry completely.
Can you still see the message when the paper has dried - With the help of an adult, plug in the iron and put in on high setting. Carefully run the hot iron over the paper several times.completely?
What happens when you apply heat to the paper? Why does this happen?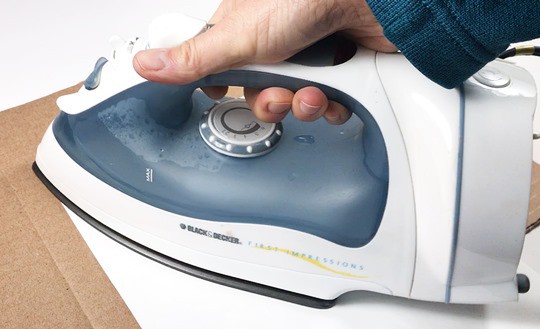 Method 2:
- Dip a Q-tip into the baking soda solution from your second cup.
- Use the damp Q-tip to draw a letter, symbol, or write a secret message on the white cardstock paper. Re-wet your Q-tip if necessary. Be careful to not soak the paper too much.
How does the paper look after you have written on it? Can you see your message?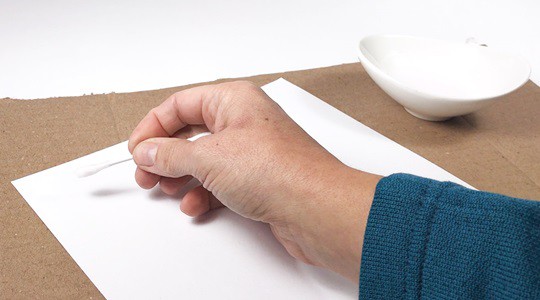
- Let the paper dry completely. If you see baking soda residues on the paper, remove it with a paper towel.How does the paper look when it has completely dried?
- Dip a Q-tip or brush into the prepared turmeric solution. Paint the whole paper with the turmeric solution being sure to cover the secret letters you wrote with your baking soda Q-tip.
What do you notice? Can you explain your results?
Clean Up
- Discard of all your solutions in the sink. Let the paper dry and dispose it in the recycling bin. Wash your hands and clean your work surface.
What Happened?
Were you able to reveal your secret message with both invisible ink methods? You should have been! Applying heat to the paper with lemon juice should have made your secret message visible. Lemon juice is a relatively strong organic acid as it contains citric acid. When you write on the paper with lemon juice, the acid weakens the fibers within the paper, and it starts to decompose. At the same time, the carbohydrates from the lemon juice—like the citric acid—are absorbed into the paper. Carbohydrates don’t like heat and therefore when you use the hot iron on the paper with your secret message, the carbohydrates start to carbonize. This process releases carbon which oxidizes when it comes in contact with air. This oxidation reaction yields brown substances which make your secret message visible.
The baking soda on the other hand is alkaline or basic. It gets absorbed by the paper similarly to the lemon juice and once dried isn’t visible anymore (although you might have noticed some baking soda powder residues on the paper, which you can wipe off easily). This most likely changed when you painted the paper with the turmeric solution as turmeric changes color depending on if it is in an acidic or alkaline environment. When it comes in contact with an alkaline or basic substance such as the baking soda on the paper, it turns from yellow to a deep red. Your secret message gets revealed! Concentrated grape juice should have also made your message visible as the grape juice contains acids that reacted with the alkaline baking soda absorbed by the paper. A similar reaction is possible with other acidic solutions such as blueberry juice or hibiscus tea.
Digging Deeper
Invisible ink is an ancient invention and has already been used over 2,000 years ago. Its purposes were manifold, ranging from plotting conspiracies or espionage to writing secret love letters. Since then, many different recipes for secret ink have been developed. All of the recipes are based on chemical reactions that make one of the components inside the ink visible. The type of chemical reaction can vary, but they all result in a colored end product that makes the ink visible.
There are several types of reactions that can be used to expose invisible ink including acid-base, oxidation-reduction, and heat reactions. Acid-base reactions occur when an acidic or alkaline component of the ink can be made visible by a special chemical (indicator) that changes color depending on if it is in an acidic or alkaline environment. Similarly, oxidation-reduction reactions can be used, in which a chemical compound changes color depending on its redox state. You can also make use of the fact that some chemical compounds are sensitive to heat or light and change color once they are exposed to these conditions.
Depending on the type of chemical reaction the invisible ink is based on, making the ink visible can take different forms such as adding heat, applying a certain chemical or using ultraviolet light. All these special treatments result in the secret message being revealed.

Materials
- Transparent cups or glasses (2)
- Cooking oil (about 1 cup)
- Water (about 1 cup)
- Fork
- Spoon
- Food coloring (any color)
- Medicine dropper or pipette
- Small bowls (2)
- Tablespoon

Prep Work
- Find a work area that can tolerate water and oil spills.
- Fill one of the cups with room temperature water.

- Fill the other cup with oil.
Instructions
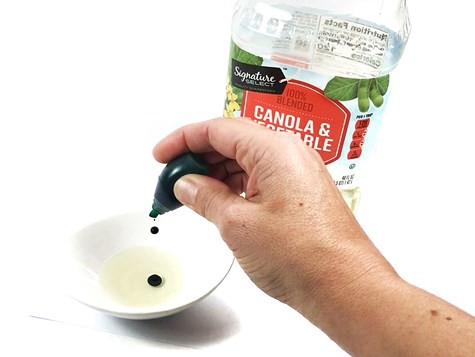
- Into one of the small bowls, add one tablespoon of oil and 10-20 drops of food coloring. Mix both liquids with the fork.How does the liquid look after you mix both solutions? Do both liquids mix?
- Take the glass of water and place it next to the small bowl. Suck up some of the oil-food coloring mixture with a medical dropper or pipette, and carefully put one drop into the glass of water.
What happens with the drop when it falls into the water? Does the drop float on top or sink to the bottom of the glass?
- Add more drops of the mixture to the water drop by drop.
Does the food coloring change the color of the water? How does it look? How long does it take for the water to completely change color? - Mix the contents of the water glass with a spoon or fork.
Does the solution look different after mixing?
- Into the second small bowl, add one tablespoon of water and 10-20 drops of food coloring. Again, mix both liquids with a fork.
How does this solution look after mixing? Are both liquids miscible?
- Take the glass of oil and place it next to the small bowl. Suck up some of the water-food coloring mixture with the rinsed and cleaned dropper or pipette, and carefully put one drop into the oil.
What happens to the drop this time? Does it float or sink?
- Add more of the water-food coloring liquid to the oil drop by drop
Does the oil change color due to the food coloring? How does the mixture look? - Finally, mix the contents of the oil glass with a spoon or fork.
How does the solution look different after mixing?
Clean Up
- You can pour the water and food coloring down the drain. Collect all the used oil in a sealable container and seal it. Then, throw the whole container away with your regular garbage.
What Happened?
As you probably experienced, oil and food coloring do not mix well. This is because food coloring is a polar liquid, but oil is a nonpolar liquid. If you mix the two, you will see lots of little food coloring drops dispersed in the oil, but both liquids do not mix. When you add this mixture to the water in the glass, again, the oil will not mix with water, as this is also a polar substance. The oil will form a separate layer on top of the water, as oil is less dense (or lighter) than water. The food coloring, which is also heavier than oil and able to mix with water, sinks to the bottom of the oil drop or layer. As soon as it reaches the oil/water interface, it will start mixing with the water molecules through a process called diffusion.
That means that the food coloring molecules move from a high concentration of food coloring to a lower concentration of food coloring inside the water. This is why you do not see all of the water changing color immediately, but a slow mixing of both with some parts of the water still clear and others becoming colored. These color bursts and food coloring trails within the water might have reminded you of fireworks exploding in the sky and slowly falling to the ground. When you mix the solution with a fork or spoon, all of the food coloring molecules are spread equally within the water and the whole solution becomes colored.
On the other hand, if you mix the food coloring with the water, both liquids will mix immediately. When you add a drop of this mixture into the glass of oil, you should have noticed that the drop sinks all the way to the bottom of the glass, as water is denser than oil. At the same time, the food coloring stays mixed with the water, but does not mix with the oil. Even when you mix the solution with a spoon or fork, both liquids stay separated. You used this effect to make your own lava lamp when you did the extra activity!
Digging Deeper
You probably know the saying “oil and water do not mix,” which is true. But why is that so? Some liquids do mix to become a homogeneous mixture, while others do not. This depends on their miscibility. Whether a liquid mixes with another is dependent on their individual molecular structures. Molecules can be classified into polar and nonpolar molecules. When atoms come together to form a molecule, they share negatively-charged electrons in a chemical bond. Sometimes, one atom attracts the electrons more than the other atom does, which results in a slight separation of the charge into a positive and negative pole within the molecule, which is also called an electric dipole. When this happens, the molecule is usually a polar molecule. Molecules that have an equal charge balance are nonpolar molecules.
A simple rule, “like dissolves like,” can tell you which liquids mix or not. This means that liquids with similar polarity are miscible, whereas liquids with different polarities do not mix. Water is a polar liquid, which means its molecules have electric dipoles. On the other hand, oils are nonpolar, which is why they do not mix well with water. When liquids do not mix, they separate to build two separate layers on top of each other. Which layer is on top depends on the density of each liquid. The density is a measure of mass per unit of volume, which means that the heavier liquid will sink to the bottom and the lighter one will float on top.

Materials

Teacher or another adult:
- Utility knife
Per group of up to four students:
- Disposable, empty transparent bottle (10–16 fluid ounces) made of hard plastic (such as a sports drink bottle)
- Two balloons, with a few extra in case one pops (8-inch balloons work well)
- Scissors
- Optional: Tape
Prep Work
- Empty and clean a transparent disposable bottle made of hard plastic, one per group of students.
- Cut off most of the plastic bottle’s bottom so that when a balloon hangs inside the bottle from the spout, as shown in Figure 4, there is about 1/3 to 3/4 of an inch of empty space below the balloon.
A balloon inside a bottle will represent a lung inside a ribcage. - Watch the video below. It explains how to make the lung model step-by-step, and how it models human breathing. Decide whether you want to use the video as a guide to make the model during the lesson, or practice making a model yourself now so you can guide the students during the lesson.
Make a lung model tutorial
Explore
Part 1: Explore the human lung
- Explain that the students will make a model to test their ideas of how humans breathe.
- Divide the class into groups of up to 4 students, provide them with the Student Worksheet and the materials—plastic bottle of which the bottom has been removed, 2 balloons, and scissors —and guide them through the process of making the model. You can also use the Make a Lung Model video from 0:43 to 1:55 to guide the students step-by-step. A slideshow with Figures 5–14 is also available.
- If the edges where the bottle has been cut off are sharp, cover them with tape.
- Set the cut bottle down on the wide opening. Lower a balloon into the bottle until only part of the balloon’s neck sticks out. Fold the neck of the balloon over the top of the bottle, as shown in Figure 5.
Figure 5. A balloon hanging inside a bottle will represent a lung inside a ribcage. - Turn the bottle over (keeping the balloon inside) so the bottle top rests on the table.
- Make a knot in the neck of the second balloon. On the opposite side of this balloon cut off about one-third of the balloon, as shown in Figure 6 so you are left with a wide opening.
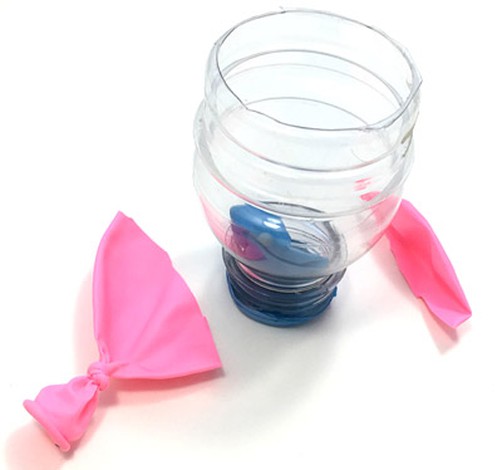
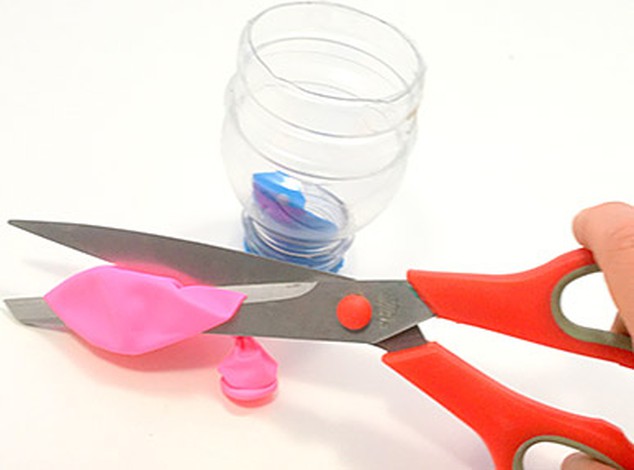
Figure 6. A section of a second balloon will be used to add the diaphragm to the model. - Stretch the wide opening of the cut balloon over the wide opening of the bottle. Pull the edges of the balloon far enough up the bottle so the balloon surface is gently stretched. Make sure that the knot is on the outside and located near the middle of the bottle opening, as shown in Figure 7.
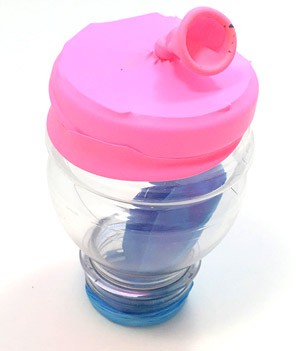
Figure 7. A stretched-out balloon will represent the diaphragm.3. Help students explore their model.
- Ask the students to hold the bottle so they can see the balloon inside.
- Let the students observe what happens to the balloon inside the bottle when they pull the knot back, as shown in Figure 8.
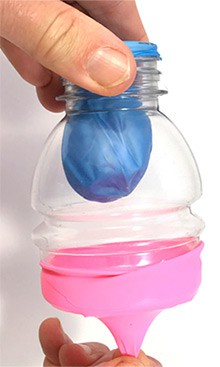
Figure 8. Pulling back the knot makes air rush into the balloon. As a result, the balloon inside the bottle fills up. - Then point their attention to what happens to the balloon inside the bottle when they let the knot gently come back to its neutral position and then gently push it in, as shown in Figure 9.
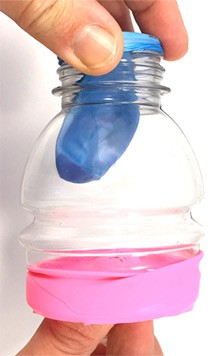
Figure 9. Pushing the knot in makes air rush out of the balloon. As a result, the balloon inside the bottle collapses.- Ask students to repeat this process a few times so all members of the group have tried it out and had an occasion to observe.
- Let students discuss with their group how this is similar to how we breathe. Have students write down their observations and thoughts as they answer questions 2–4 on the Student Worksheet.
- Explain that the “human respiratory system” refers to the collection organs and body parts that help us breathe. Encourage groups to label the parts of the respiratory system that they know on their worksheet and ask them to find a part in the model that has the same function.
- Review similarities between their model and human breathing.
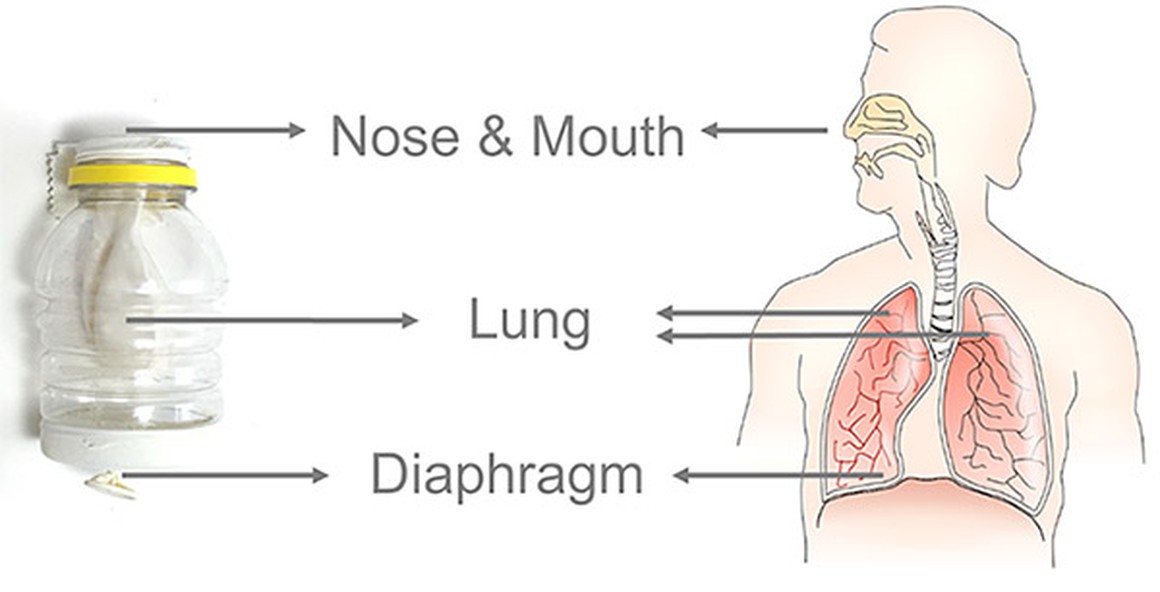
- Listen to how the students felt their model is similar to the human respiratory system and to how we breathe. Guide the students where needed. At the end of the discussion, students should know the main parts of the human respiratory system: the nose, the trachea or windpipe, and the lungs, as shown on Figure 10. Figure 11 shows the similarities with the model. Students should understand that when humans breathe in, their lungs fill up with air just like the balloon in their bottle filled up with air when they pulled the knot back. When humans breathe out, air flows out of their lungs just like air flowed out of the balloon when they pushed the knot in. Humans have two lungs, and the balloon inside the bottle is like one of their lungs.

Figure 10. Parts of the human body that are involved in breathing.
Explain the role of the diaphragm.
- Listen to how the students felt their model is similar to the human respiratory system and to how we breathe. Guide the students where needed. At the end of the discussion, students should know the main parts of the human respiratory system: the nose, the trachea or windpipe, and the lungs, as shown on Figure 10. Figure 11 shows the similarities with the model. Students should understand that when humans breathe in, their lungs fill up with air just like the balloon in their bottle filled up with air when they pulled the knot back. When humans breathe out, air flows out of their lungs just like air flowed out of the balloon when they pushed the knot in. Humans have two lungs, and the balloon inside the bottle is like one of their lungs.